main interface & mixer
1. Top of the Interface
A. Home Menu Button – Clicking brings up the Home Menu
B. Skip Back Button – Returns the Playhead to bar 1 – default hotkey: [return/enter]
C. Back Button – Places the Playhead on the previous Marker on the Timeline (or previous bar if there are no previous markers) – default hotkey: [shift + B]
D. Toggle Play Button – Starts or stops Playback – default hotkey: [space bar]
E. Forward Button – Places the Playhead on the next Marker on the Timeline (or next bar if there are no subsequent markers) – default hotkey: [B]
F. Song Title – Displays the Song’s title. Clicking on the Song Title also brings up the Song Summary.
G. Song Summary Button – Brings up the Song Summary of current song
H. Current Band – Shows the band that is currently playing
I. Current Set – Shows the current set
J. Tempo Display – Displays the tempo of the song. Clicking on the Tempo Display brings up a dialog where you can edit the tempo. Note –This area only displays the nearest whole number BPM (beats per minute). However, Caedence can play back tempos as precise as 1/1000th of a beat (eg- 111.987 BPM). Also, the tempo can only be edited only by the Band Leader during a Performance. Band Members can only edit the tempo when practicing individually. However, the tempo change will only affect that user’s browser session. The tempo change won’t be saved.
K. Key Signature Display – Displays the key signature of the song. Clicking on the song’s key signature brings up a dialog where you can transpose the song. You can also set the flat/sharp and major/minor distinctions in this dialog. Transposing the key signature will also affect the chords, chord diagrams, as well as any unlocked MIDI tracks. The key can only be changed only by the Band Leader during a performance (meeting). Band Members can adjust the key signature when practicing individually. However, the key signature change will only affect that user’s browser session. The key signature change won’t be saved.
L. Bar and Beat Display – Displays which bar and beat the Playhead is currently on.
M. Mixer Toggle Button – Displays or closes the Mixer for Band Leaders and Band Members who have Mix Permission. During individual practice, all Band Members can adjust the Mixer. However, their mix changes will not be saved – unless that Band Member has Mix Permission.
N. Setlist Flyout Toggle Button – Displays or closes the Setlist Flyout.
O. File Load Progress Flyout Toggle Button – Displays the download progress of media files that a Song/Set contains. Clicking this button pulls up a more detailed view in the File Load Progress Flyout.
P. Click Subdivision Options – Chooses between quarter-notes, eighth-notes, and eighth-note triplets for the click track.
Q. Count-Off Options Button – Opens a dialog where you can choose the number of bars of click and/or count for the countoff- (0-4 bars for click and/or count) Note – The count-off setting applies no matter where you begin Playback.
R. Playhead – Shows exactly where you are in the Song/Timeline.
S. Marker – Text input used to break songs into sections and/or provide other instruction. Song Owners can place markers on any eight-note of the Timeline by entering the Timeline Editor.
T. Timeline – The horizontal display of Markers, Timeline Commands, and Time Signature Display.
U. Subdivision Tick Line – Usually shows quarter-note or eighth-note Tick Lines depending on the zoom level.
V. Bar Tick Line – Shows bars. When using the Zoom In or Zoom Out hotkeys, the view will change by half or double the resolution.
W. Timeline Command – Song Owners can place Timeline Commands on any eighth-note of the Timeline by entering the Timeline Editor. See the Timeline Commands section for more information.
X. Time Signature Display – Displays the time signature of a song or bar. Song Owners change the time signature on the first eighth-note of any bar by entering the Timeline Editor. The default time signature for a new song in Caedence is 4/4.
2. Track Controls
The Track Controls area is where Band Leaders and Band Members can control many aspects of how specific songs will display and behave.
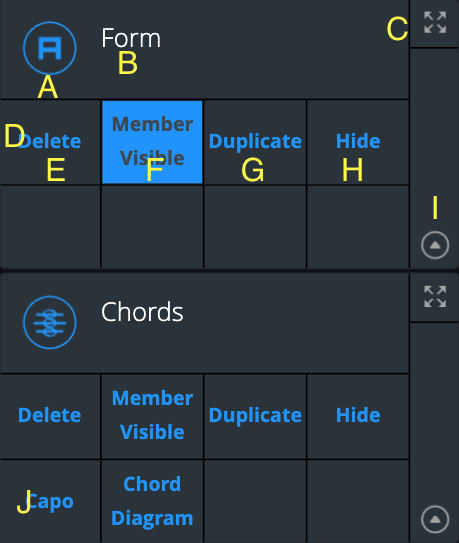
A. Track Type Identifier – Each Track type has its own unique identifier icon.
B. Track Name – Displays a Track’s name. Clicking on the Track Name brings up a dialog where the Song Owner and Band Members (with correct permissions) can edit it. Note – Editing the Track Name is only possible when the Track is set to regular height.
C. Track Full-Screen Button – Sets a full-screen view for that Track. Chords, Lyrics, PDF, Image, MIDI, and Video Tracks have full-screen views. See the More Details About Full-Screen View section below and Track Type section for more information.
D. Track Control Tray (Top Row) – All tracks types have the following functions in the top row of the Track Control Tray:
E. Delete Track Button – Deletes a Track (Song Owners only). Note – All Blocks on a Track must be deleted before that Track can be deleted.
F. Track Member Visible Toggle Button – Hides or reveals a Track to Band Members (Song Owners only). Note – Band Members with permission for a Track will still be able to see that Track even if the Song Owner has not made it visible to all Band Members.
G. Duplicate Track Button – Creates an exact copy of the Track (Song Owners only)
H. Hide Track Button – Hides a Track for a specific user based on their preferences. All Band Members can customize which Tracks are hidden. These view preferences are saved automatically per user and persist across different devices until the user makes a subsequent change.
I. Track Height Toggle Button – Toggles a Track between short and regular height. Note – All Band Members can set the height of each Track. These view preferences are saved automatically per user and persist across different devices until the user makes a subsequent change.
J. Track Control Tray (Bottom Row) – Different Track Types may have additional track-specific functionality in the bottom row of the Track Control Tray. See the Track Types section for more information.
More Details About Full-Screen View
- All Band Members can choose which Track is in full-screen on their view. These preferences are saved automatically per user, per song and persist across different devices until the user makes a subsequent view change.
- As implied, only one Track can be in full-screen at a given time.
- As soon as Chord, Lyric, PDF, Image, and Video Tracks are toggled to full-screen, they immediately enter full-screen view. If there is no content Block underneath the Playhead when a Lyric, Image, or Video Track is put into full-screen, the screen will display as black until the Playhead moves over a Block with content. This is normal behavior.
- On desktops/laptops, use the “Escape” key to exit a full-screen view and return to the Main Interface. In touch environments (iPads and other tablets), use a three-finger touch.
- Once you go to full-screen view, that view is saved.
4. Setlist Flyout
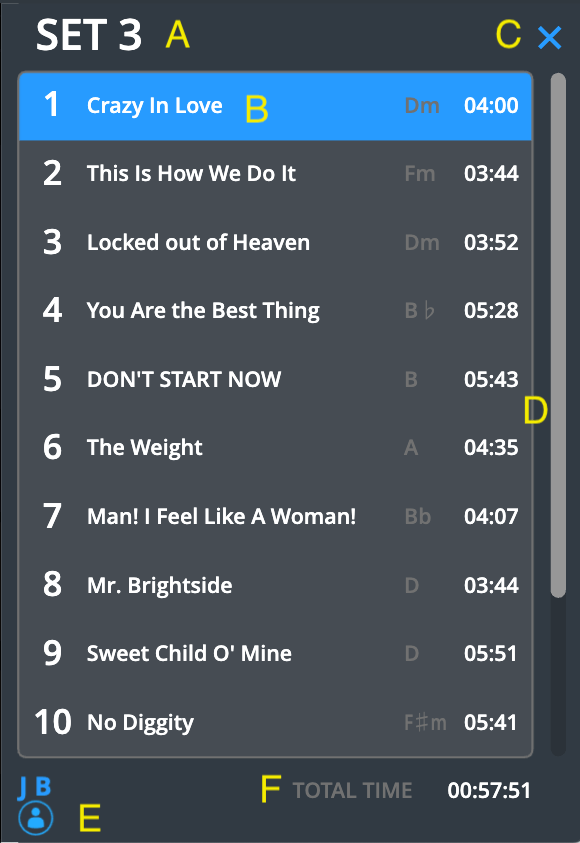
The Setlist Flyout displays the Songs in a Set and other helpful information for Band Leaders and Band Members.
A. Set Name
B. Song Title with Key Signature and Duration – Note: The Key Signature of a Song can be saved “per Set. As such, the Key Signature you see in a Setlist may differ from the original Key Signature when the Song was first created by the Song Owner.
C. Setlist Flyout Close Button
D. Vertical Scroll Indicator
E. Band Member(s) present on Stage
F. Set Total Time
To choose Songs when the Setlist Flyout is open, click on a Song, or use the following Commands when the Setlist Flyout is open or closed:
- Next Song In Set – Default Hotkey – N
- Previous Song In Set – Default Hotkey – P
5. File Load Progress Flyout
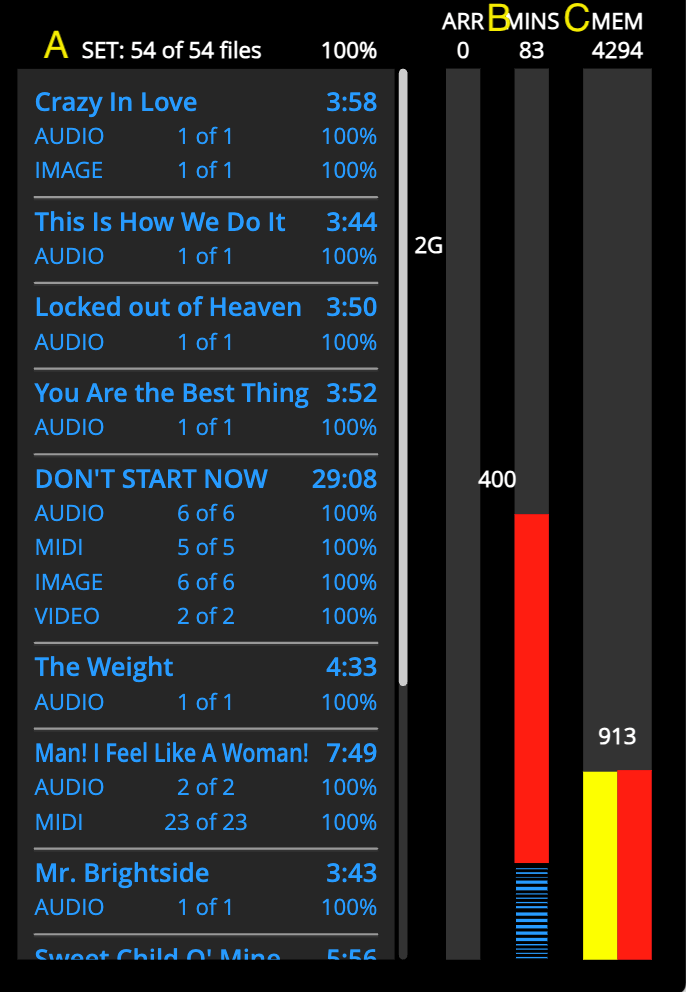
The File Load Progress Flyout displays the status of file loading (Audio, MIDI, Images, and Video) for Songs or Sets – as well as other helpful information.
A. File Upload Status – The text of this section will first appear white. As files for each Song load and reach 100% completion, the text will turn blue. When all the files for a song are loaded, the Song Title will turn blue. Files are loaded in chronological order.
B. Audio Minute Usage Meter – The top of the meter shows how many audio minutes have been loaded. The colored display shows the used audio minutes (blue) and the Max Audio Minutes (red).
C. Memory Usage Meter – Displays the amount of memory the browser is using
6. The Bottom of the Interface
The Bottom of the Interface provides useful information and functionality.
A. Save Status Icon – Displays if/when song edits have been saved to the database. During saving, you will temporarily see a blue circle arrow icon. Once the saving is complete, you’ll see the Saved Icon (cloud). When connected to the Internet, all changes in Caedence are saved in real time – as such, there is no “save” button.
B. Undo Button – Undoes certain edits
C. Add Track Button – (Song Owners only) – Opens a dialog to choose a track type and add it to the Song.
D. Show All Tracks Button – All members – clicking on this button will unhide any previously hidden tracks. If there are any hidden tracks, this button will be blue.
E. Horizontal Scroll Bar – This area has a light button that changes depending on your zoom level and place in the Song. Grabbing it also lets you visually pan to different points in the Song.
F. Zoom In
G. Zoom Out
8. The Mixer
The Mixer enables you to mix audio and MIDI tracks. During a performance, mixing can only be performed by Song Owners or Band Members with Mix Permission. During individual practice, all Band Members can mix during their browser session. However, only Band Members with Mix Permission will have their mix edits saved.
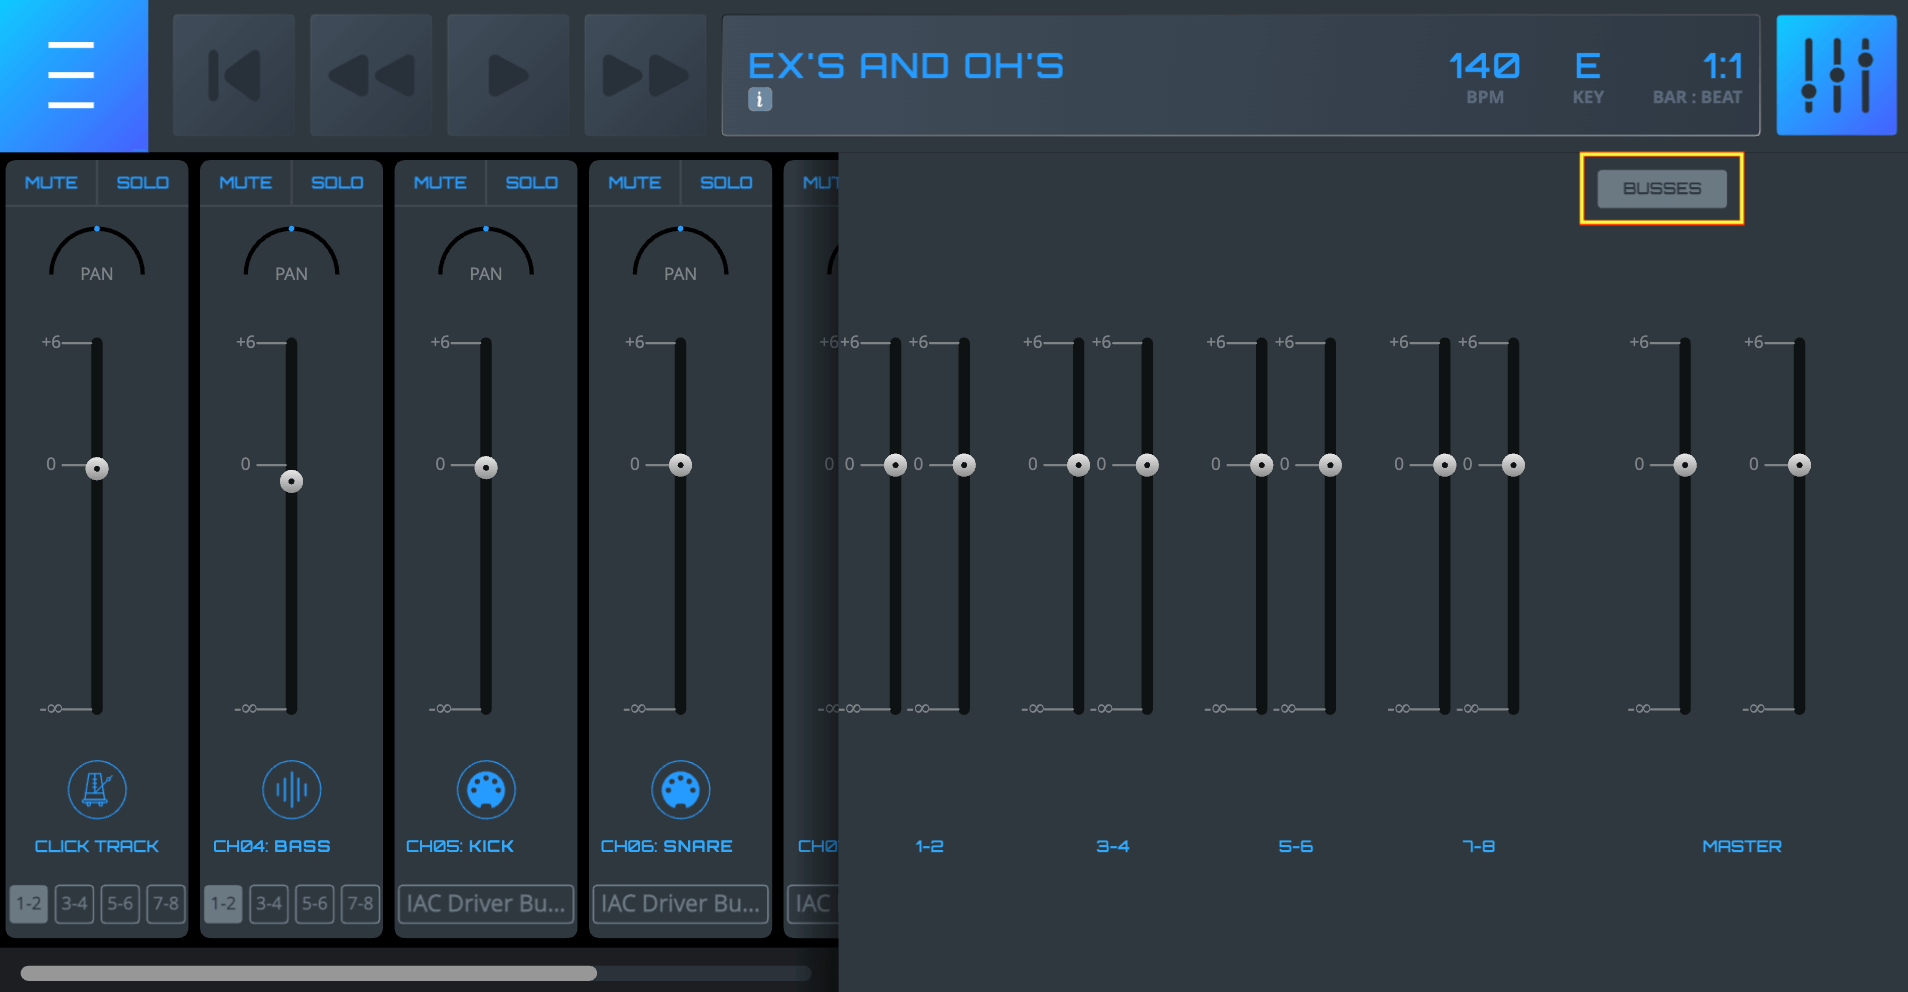
To access the Mixer, click on the Mixer icon in the upper right corner of the Main Interface. To return to the Main Interface, simply click the Mixer icon again. In addition to your audio and MIDI tracks, the Click Track is permanently docked to the left side of the Mixer. Note that Top of the Interface is still available in the Mixer.
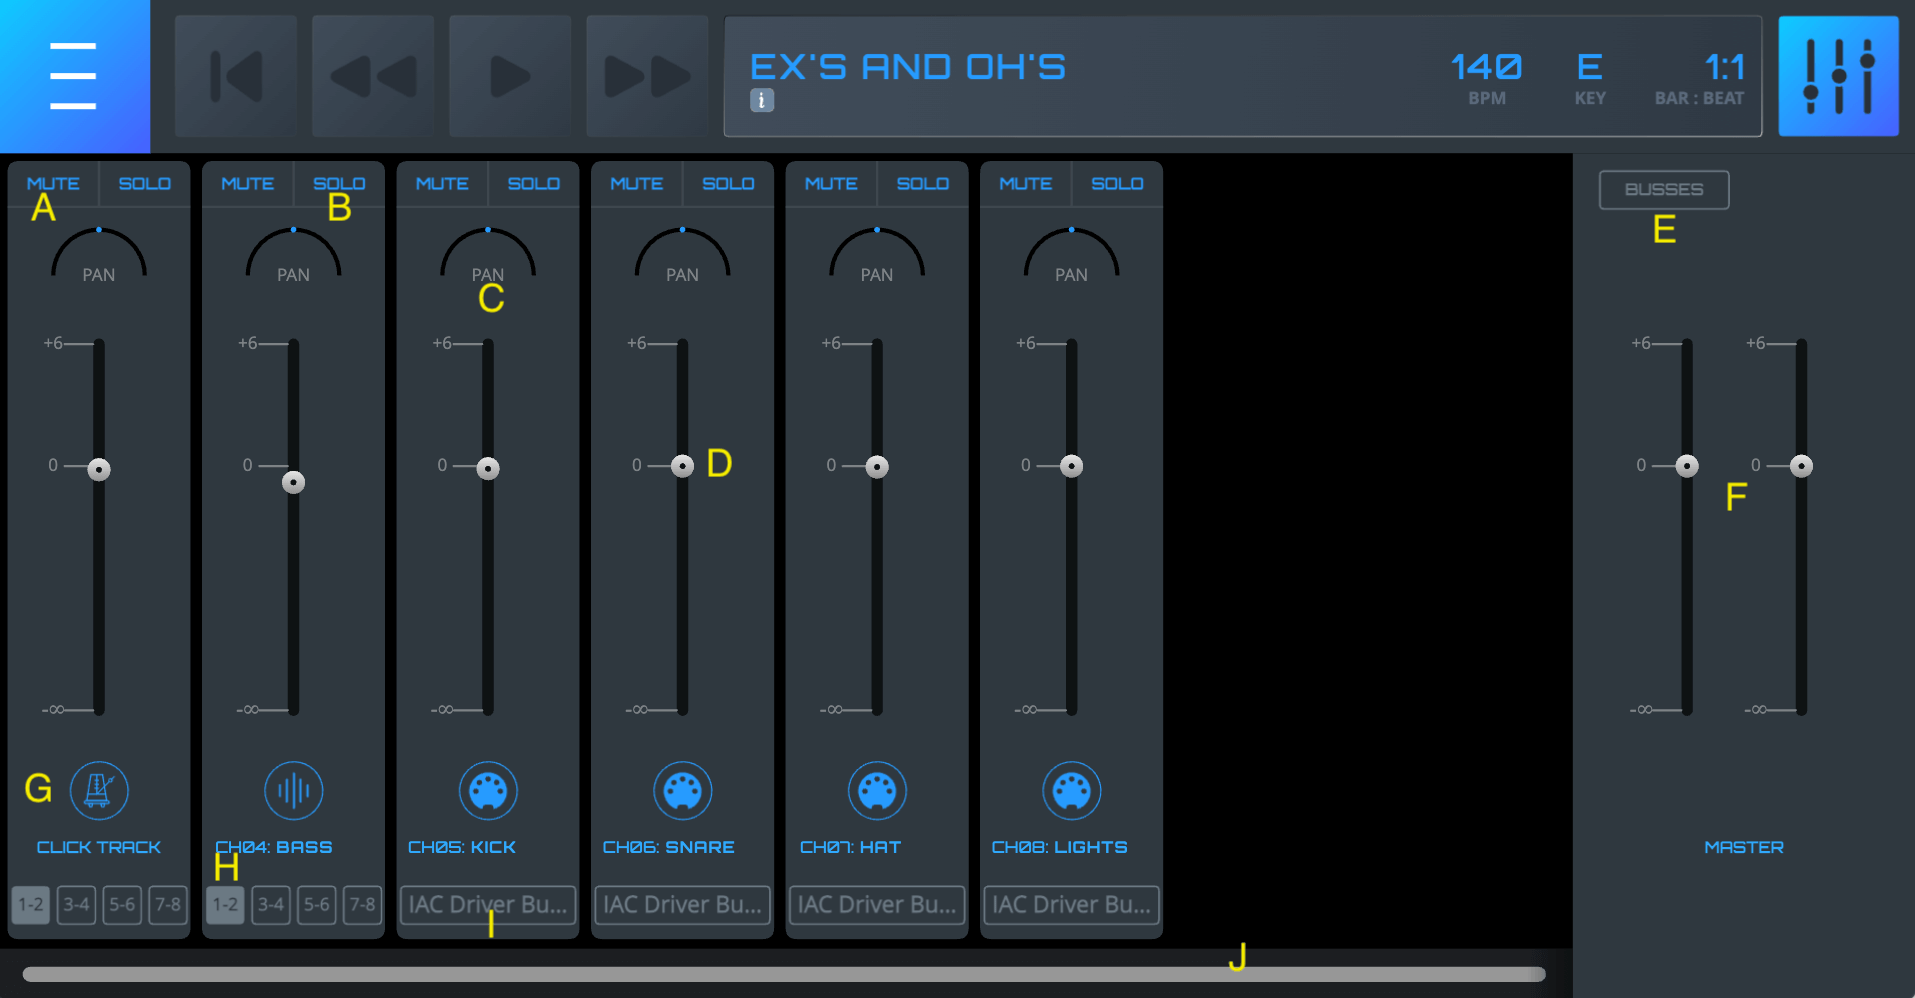
A. Mute Button
B. Solo Button
C. Pan Knob
D. Volume Fader
E. Bus Flyout Toggle Button
F. Master Volume Fader (the left and right sides are “locked” together)
G. Click Track (always the left-most strip)
H. Audio Bus Selector
I. MIDI Output Button – Displays the current MIDI output(s) associated with that track . Clicking on it pens dialog where you can assign/edit MIDI channel(s), output(s), and Transpose Lock.
Using an Audio Interface With Caedence
Audio tracks (including the Click Track) can be assigned to one of eight mono (4 stereo) busses. If you are using an audio interface in conjunction with Caedence, you can send these channels to mixing engineers. The bus numbers are indicated at the bottom of audio tracks and the click track. To assign to mono channel one, pan the audio hard left. To assign to mono channel 2, pan hard right. To assign to stereo bus 1-2, leave the audio centered. The same concept applies to busses 3-4, 5-6, and 7-8.
Mixing Directly From the Caedence Interface
Alternatively, Song Owners and Band Members with Mix Permission can mix directly from Caedence. Simply move the faders, knobs, and buttons. With MIDI Learn, you can also mix from a MIDI Control Surface.
Bus Flyout
The Bus Flyout gives you access to the four stereo busses – and another gain stage to balance your sound. Similar to the Master Volume Fader, the Bus Faders are “locked” together.
Gain Stages
In total, Caedence provides three gain stages for audio tracks (individual tracks, busses, and the master output).
Saving Mix Edits
Edits made using the Mixer are saved in real time and are “per-song”. Furthermore, level, pan, mute, and solo edits made on the Mixer will be reflected on the Main Interface and vice-versa. As a reminder, only Song Owners and Band Members with Mix Permission will have their mixing changes saved. Band Members without Mix Permission can only mix when practicing, and those edits are not saved.
MIDI Tracks
MIDI Tracks are not routed through the audio busses, and as such have only one point of control in Caedence. You can access the MIDI Track settings by clicking on the MIDI Output Display at the bottom of MIDI tracks.
MIDI Learn
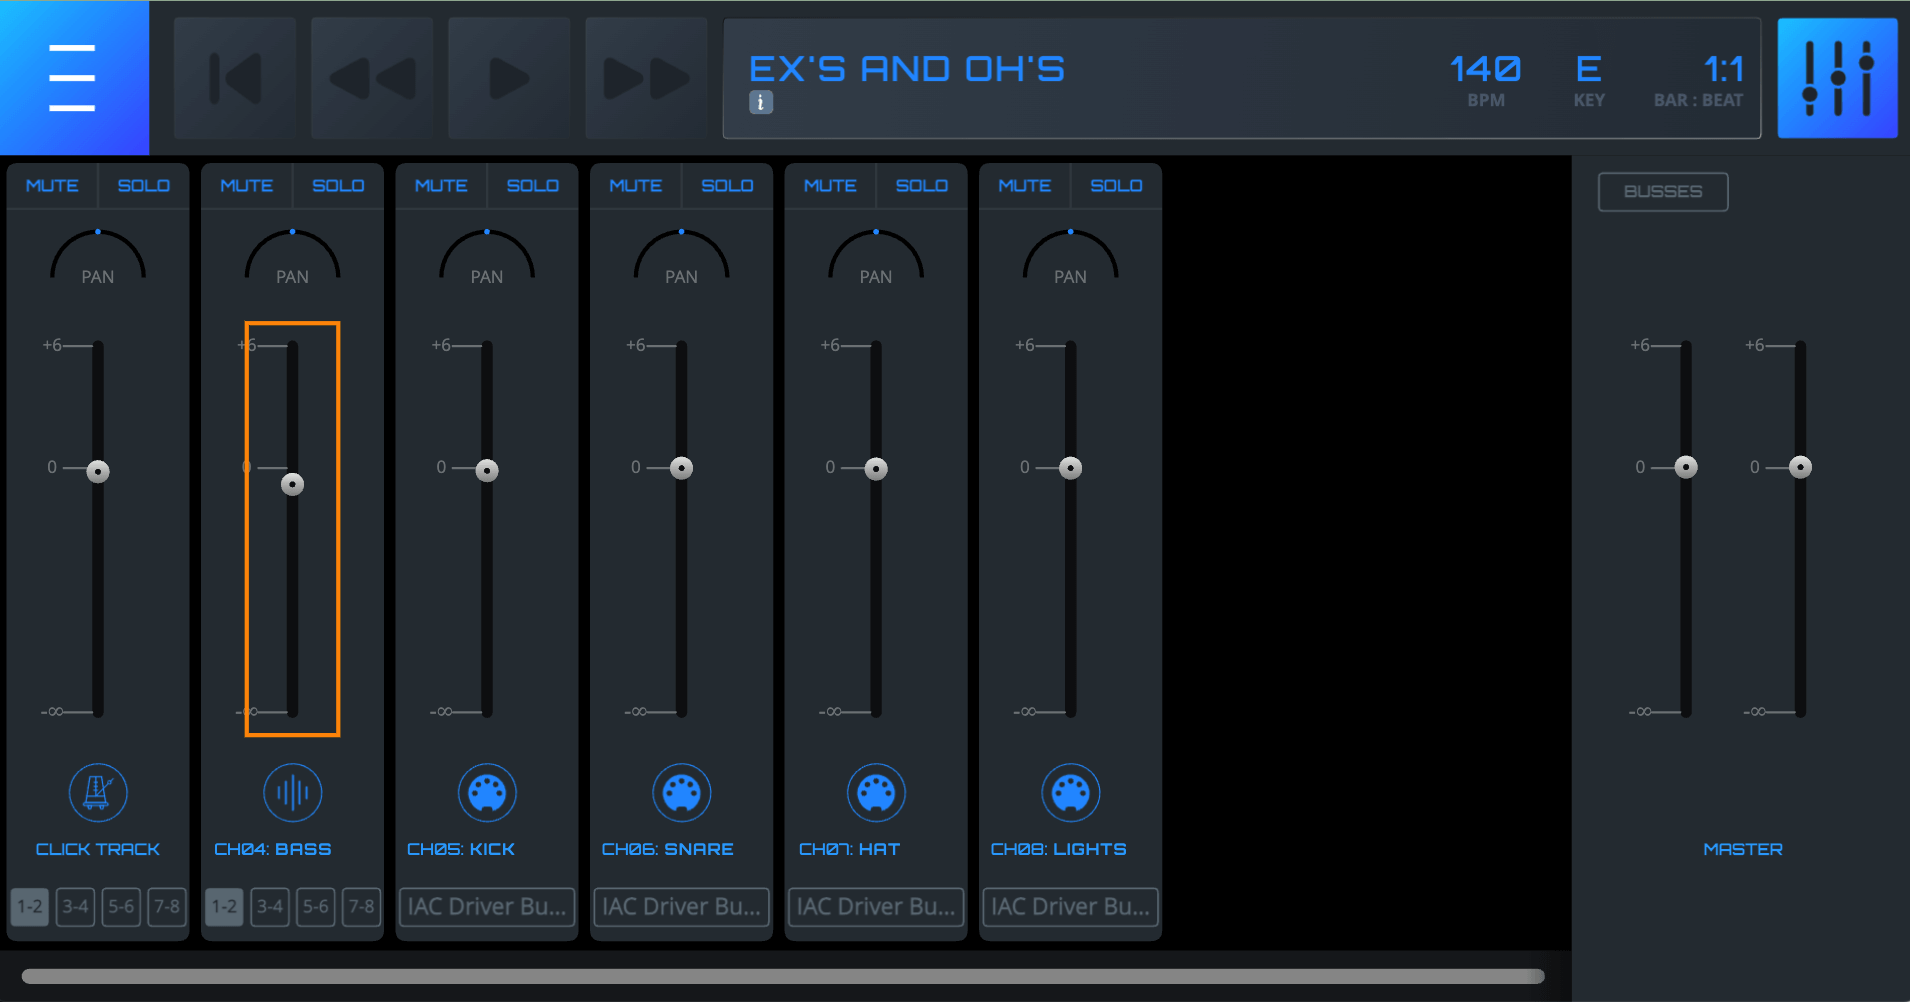
The MIDI Learn function allows you to assign MIDI controls to mix parameters within Caedence. Note – MIDI Learn assignments are also “per song.” To initiate MIDI Learn:
- Connect a MIDI device to your computer.
- Right (control) click on the parameter you want to control (ie- a volume fader). An orange box will appear around the selected parameter.
3. Activate a knob/slider/button on your MIDI device. You will see that you are now controlling the parameter from your MIDI device.
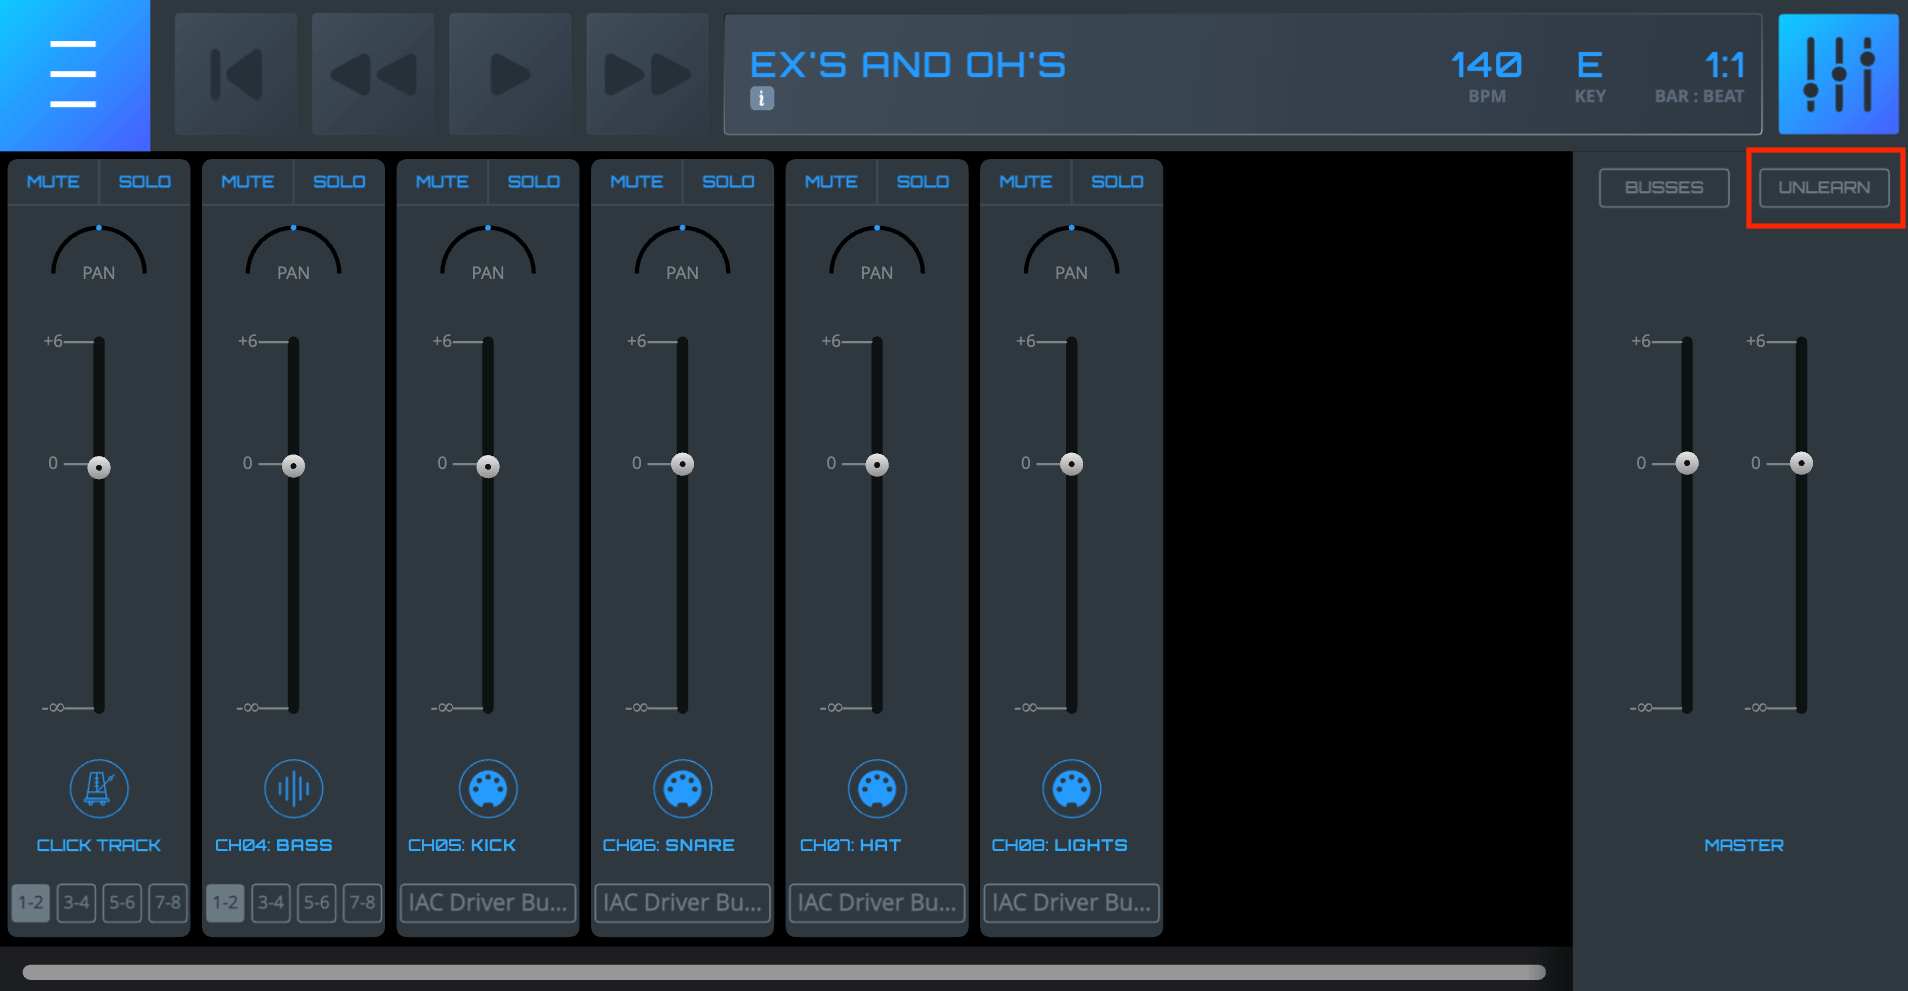
4. Once you have one or more parameters assigned to a MIDI Controller, you will see an “Unlearn” button.
To “unlearn” a MIDI assignment:
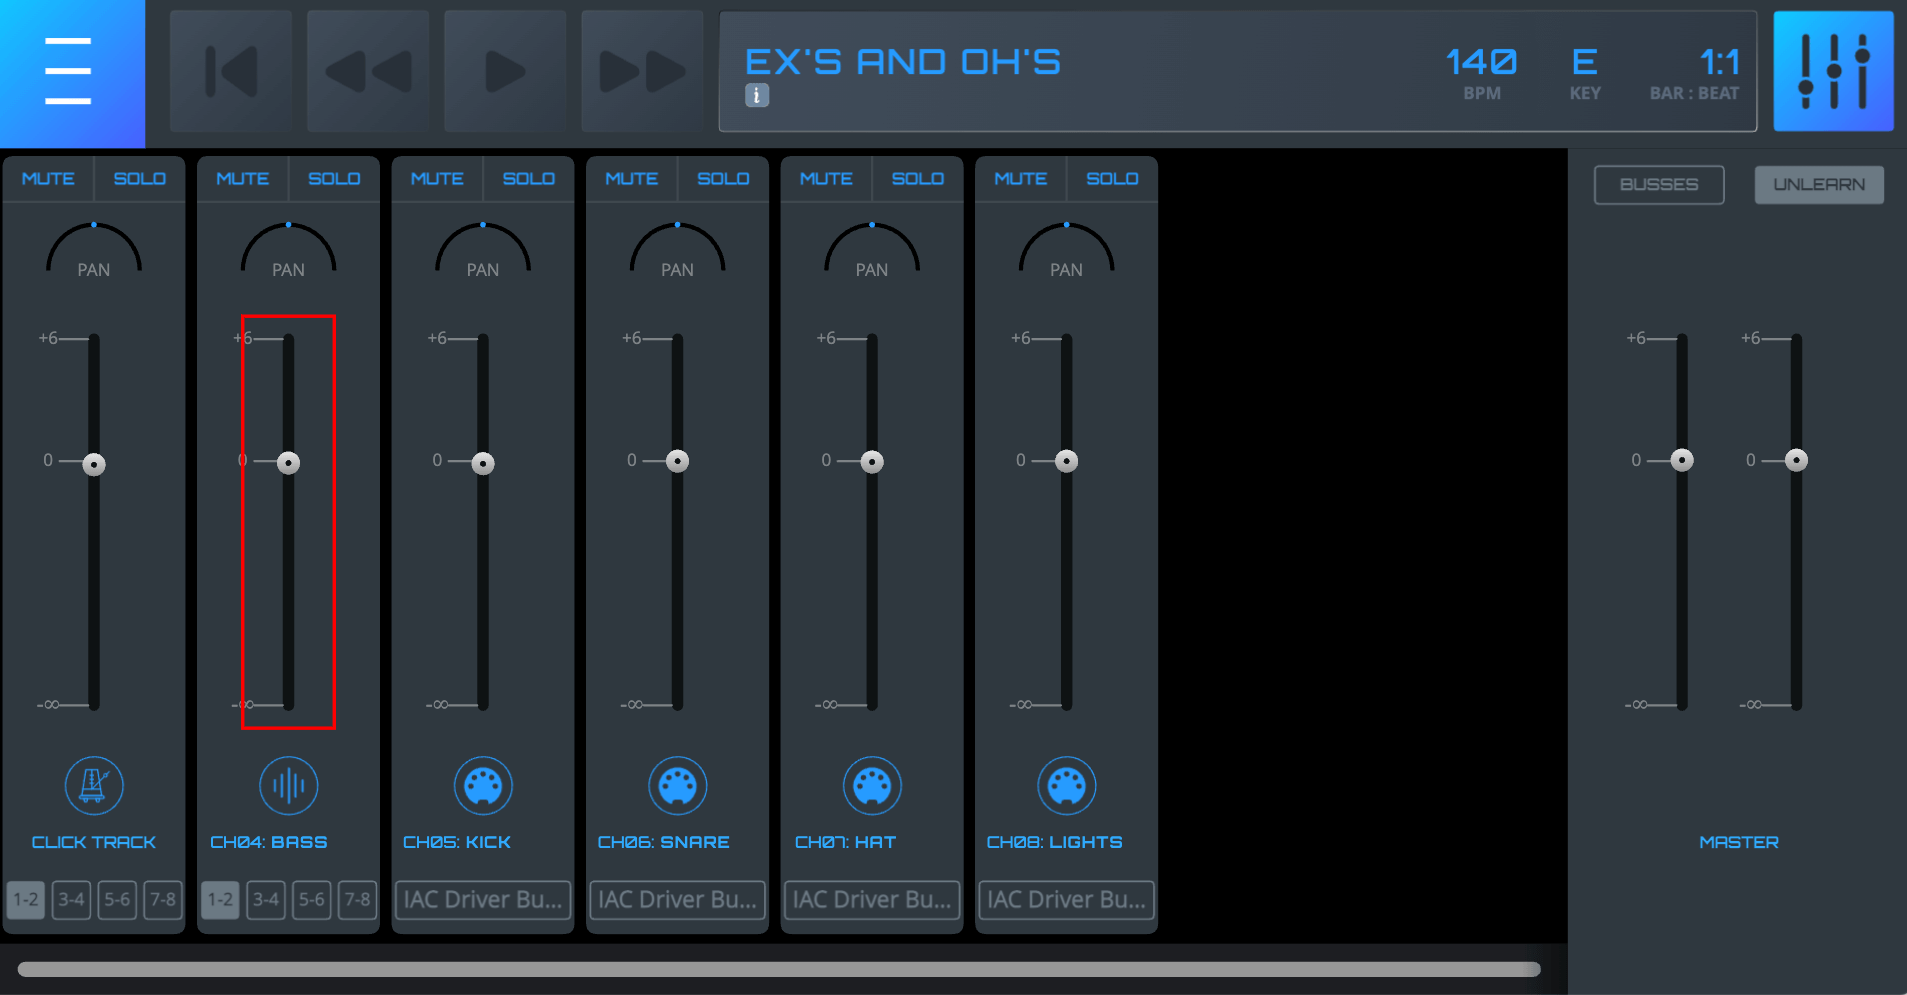
- Click “Unlearn”. Any parameters assigned to MIDI will be surrounded by a red box
- Click on or within the red box to remove the MIDI assignment for that parameter. After clicking, the red box will disappear and the command is now unassigned.


